Showing posts with label Art. Show all posts

Wednesday, December 4, 2013

ICE! at the Gaylord National

My first visit to the ICE! exhibit at the Gaylord National sure didn't disappoint. Like the Gaylord in Kissimmee in Florida, the Washington D.C. version at the National Harbor sports a gigantic glass-enclosed atrium, just minus the alligators grinning at meals tourists from the transplanted bayou.

Instead, this Gaylord went for more of a classic stroll-in-the-park theme with cafes, restaurants, and shops peeking from amidst the dense trees and glowing street lights. However, the real star of the Gaylord was the view from the mammoth windows overlooking the magnificent Potomac River.


Suspended Christmas Tree in the 18-story glass atrium of the Gaylord National.
The massive windows overlook the glittering lights of the National Harbor.


A veritable city of rooms surround the bedecked atrium.

Hidden in gigantic tents outside the hotel, ICE! is a clever mixture of traditional, clear-as-crystal ice sculptures and vividly colored sculptures of bright cerulean, lemon yellow (at least I hope it's lemon), and geranium red evoking scenes from "The Night Before Christmas," followed by a finale of "Christmas in New York." 


Entrance to ICE! The letters appeared to be fiberglass, but everything else
was pure ice, from the bright yellow background to the brick walls
and whimsical swirls.


An icy arch seems to be made from enormous candy and sugar-spun bricks

Delicate crystalline dove adds a sweet contrast to the vivid and mod surroundings.

The temperature remained at about nine degrees, so my friend and I had bundled up in enough layers to give Randy from A Christmas Story a run for his money.


On top of this, the staff at the Gaylord gave us each an oversized, hooded, calf-length parka of which any Arctic explorer would approve. The parka also acted as a sort of built-in sled when we reached the ice slides near the end of the tour. "Lift your feet up!" called the attendant at the bottom of the slide as I began sliding down in a seated position. A suggestion which, if followed, will tilt the unsuspecting victim on their back so that the slippery parka turns into an Olympic-speed toboggan. 

Most ungraceful, but I felt like a little kid all over again. Sadly, I was too busy laughing hysterically to get a picture of my friend sliding down after me.


Solid ice comprises the Christmas tree, the presents, and the huge
slides on either side of the room. Only the tinsel-y tree trimmings were non-ice.

Yeah, yeah, I know my photo's crooked and shaky. But I kept having to take my hand out of my glove to snap photos and by this time I couldn't even feel my fingers. 

Santa and sugarplums then gave way to a trip into New York City on a wintry night, where even the Statue of Liberty has joined the festivities by donning a red suit and hat. Again, great subject, rotten photo. My poor frozen fingers. I finally broke down and whipped out the HotHands hand warmers.


Santa of Liberty

Check this out: "Phantom of the N. Pole" and a poster that looks like a Galapagos penguin photobombing Les Miz. Technically not made from ice, but I don't think I could have resisted doing this, either.


Broadway Signs

At the end of the walk-through, we came upon a larger-than-life nativity with incredible detail and delicacy. My flash revealed the intense chilliness in the air, which they pumped in from overhead to maintain the 9 degree temperature, the sadists.


Nativity of ice. The matte ice creating the ground contrasted with 
the shiny figures. Methinks this art form takes a tiny bit of skill...


Awwww....


As we shuffled out the mega-tent's door and into the night air to head back into the Gaylord, we both stopped and exclaimed, "Wow, it's hot out here!" It was 40 degrees. 

I will never again complain about cold winters. We survived nine degrees all for the sake of festivity and art! I think some hot chocolate is in order. Spiked.

Or maybe I'll just steal some treats from Santa's plate.


Saturday, July 20, 2013

Art Project

For the past couple of years, my far-away cousin and I have been trading art projects. So fun! Until today, I was sending the project ideas by email with attachments, but sharing by blog will be even easier, and I won't have to limit my attachments! So, here it is, sweetie:

Freestyle watercolor

Supplies
You can get all of these supplies at Michaels, and most craft stores. I'll tell you what I use in case you're curious, but I'd recommend buying whatever's on sale. :) A good online art supplies store is Cheap Joe's Art Stuff.
  • Plastic watercolor palette
  • Watercolor paints (I like Winsor & Newton's Cotman watercolors from Michaels, but any will do. You can also get packs of watercolor paints, which are great)
  • Big watercolor brush
  • Bowl for water. I just use a recycled plastic tub from yogurt or cottage cheese!
  • Ruler
  • Watercolor paper. I use Aquarelle Arches from France, but Strathmore's really good too, and less expensive.
  • Board to tape the paper to (watercolor paper will start buckling when wet, so you need to tape it down). Sometimes I just tape it to the cardboard back of my watercolor pad if it's sturdy enough, but they also sell boards made for artists.
  • Masking tape

Prep

Get a medium sized piece of watercolor paper. If you only have large paper, just cut it in half using a ruler and scissors.

Draw a half-inch border around the paper, like the photo below. That way, instead of painting to the edge of your paper, you'll stop around this border, so that you won't lose your painting if you decide to frame it.


Next, use four pieces of masking tape to tape the paper's sides to the board:


Okay, now just fill up your water bowl, grab you watercolor palette, paints, and big watercolor brush, and you're set! I usually cover my table with a vinyl tablecloth for when I spill water and paint.

Here is my watercolor palette - it's a mess, and I love it that way. The result of years and years of use.


Now, use your big brush to slop water all over your watercolor paper, covering every inch within that border you drew.

Next, rub your wet brush on a paint color that you really like. I picked Cerulean Blue, which is a sky blue. Now, dab the brush in a few places on your paper. You're not going to cover the paper in one color, since we'll be adding a lot of different colors to see how they spread and what shapes they make.

With each new color you add, be sure to smoosh your brush around in the water bowl to get rid of the paint from the last color (unless you actually want to blend the two together).

Here's what I ended up doing. I had absolutely no plan, just kept adding colors I liked in different areas. I'll tell you what colors I used, in case there are some you really like that you want to get.

Cerulean Blue (a light, sky blue)


Black* and Naples Yellow (a pale yellow). Look at how the paint is spreading and merging.


Opera (deep pink)
Burnt Umber (brown)
Cobalt Blue (deep blue)


The paint is already doing neat things! The pink and blue look like a waterfall as paint spreads on the wet paper...


And in a place where a drop of clear water fell from my brush on the paper, it looks like a firework or sea urchin.


I'm still adding paint, more of the black, yellow, and brown, plus a few dots of red (Scarlet Lake) on the pink. Again, no plan, just having fun!


All of a sudden I had the urge to add tons of red, having no clue if it would look good or not. One thing's for sure - very fun!

Here is the end result, after it was all dry (You can use a blow drier to hurry it up, by the way.) You never know what watercolor's going to do when it dries. It can look totally different than it did when wet!


Wow, so different! 

You can even see the sharp edges on the top and bottom where I accidentally missed when wetting the paper. Cool!

When I'm planning a painting, I usually decide on a few colors I want to feature. But in this case, the idea is to just have fun and use whatever colors strike you. This painting actually looks a lot like my palette - a joyful mess. :)

That long, diagonal splotch in the middle is where water pooled. Usually I get the edge of a paper towel and soak it up, but I wanted to see what would happen. Kind of looks like a solar system.

Our next project will be similar, but we're going to add even more imagination to it. Have fun giving this a try! This should help you learn more about how watercolors act, which is interesting and always surprising.


*I made black by blending blue and brown, specifically Cobalt Blue and Burnt Umber from my Windsor Newton watercolors.


Thursday, November 22, 2012

Thanksgiving Decor - Golden!

This year, I decorated the Thanksgiving table around an heirloom: the stunning gold-plated flatware that my father inherited this year from my great-grandmother Doris Stillman Frazier, rest in peace. She survived the Great Depression, the Dust Bowl, World War II, and the deaths of her son and husband, the latter who was a veteran of the Pacific Theater. She gave my father some of his fondest memories of holidays, with her always welcoming, loving, and stable home. To honor her, I wanted to design a Thanksgiving table that highlighted these prized heirlooms.

To make the flatware's hue stand out, I chose a dark brown table cloth from Target and black napkins from Bed Bath and Beyond. I added gold chargers from Michaels under my mother's beautiful Johnson Brothers "Friendly Village" dinnerware. My favorite glasses, amber Helianthus goblets from Anthropologie, continued the gold theme.


Right before dinner, I lit taper, pillar, and floating candles on the sideboard and on the dining room table, which bathed the room in an amber glow.


So much fun - and so affordable to do, considering that most of the items were things I already owned. The beautiful goblet-style votive holders were my one splurge, and they came from Country Crafters in historic Ellicott City.

My mother made delicious pumpkin and acorn squash soup totally from scratch - and yep, that means baking the squash and scooping it all out, kudos to her! She also spoiled us with chicken breasts with traditional stuffing and, for dessert, pumpkin creme brulee. All of which, coincidentally, went perfectly with the golden hue of our Thanksgiving.

My family and I would like to incorporate this heirloom flatware in our holiday celebrations from now on, and since I am loving the idea of a Victorian / Dickensian Christmas, Grandma's gold flatware would be a gorgeous touch. Nothing like decor to transport you to whatever country or era you want. Or, in this case, to keep the spirit of someone we love near us.

Thursday, October 11, 2012

Brainstorm of a Wanna-Be Event Planner

This year, I began watching David Tutera's My Fair Wedding. Incredible, so fun to watch, and the man's a genius, with the receptions he creates looking more like dreams, paintings, or theatrical spectaculars than predictable wedding decor. Plus, he gives each bride a wedding that suites who she is. So, that got me thinking... how awesome would it be to be an event planner! 


So, what aura would I want to create, if I could plan whatever I wanted and no one cared (like that could really happen with all those bridezillas!)? But every event planner needs a trademark look regardless of theme, right? Hint of a garden theme perhaps, since I love Winterthur and Longwood Gardens? Fairy tale because I'm a Disney buff? Old Hollywood due to my classic film love? A nod to Celtic style, since I love Irish music and culture and take pride in my Scottish heritage? Heck, if I go down the heritage route, I could just as easily pick Central American, Portuguese, the list goes on and on. Gah! 


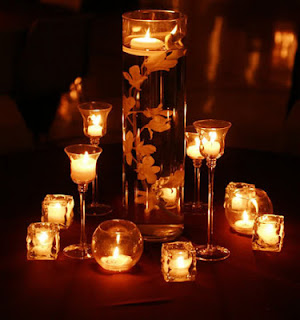
And then everything started clicking. I don't know why it didn't click before. See, when I entertain, I am obsessed with using candlelight, whether it's blush-colored tapers in cranberry glass holders for a Southern-themed Thanksgiving, or those dramatic red tapers in my antique silver candelabra when I hosted a classic film night, or just a few glass votive holders on the stairs.


Soft candlelight for Thankgiving,
inspired by SouthernLiving.com

I love Mt. Vernon by Candlelight, Annapolis by Candlelight, Bruce Munro's "Light" installation at Longwood Gardens. 


"Field of Light" by Bruce Munro

I pretty much jump for joy when I see fireflies (nature's candleight!) or attend a midnight church service that has everyone holding candles. Dear me, have I discovered a hidden obsession? Whoa. Anyhoo, apparently candlelight's my thing. Hmmm....


Mount Vernon by Candlelight

And I love theater, opera, ballet, Broadway shows, you name it - and when I saw the 2004 film adaption of Andrew Lloyd Webber's Phantom of the Opera, I was mesmerized. But, it's not the opera house that I'd want to base my wedding reception on. Again, it's candlelight. After all, when I looked up some reception decor based simply on opera, or even Phantom of the Opera, I was surprised to find that I wasn't feeling all the red velvet. Love red velvet, but more as a hint than an overwhelming sea of it! But the beauty, mystery, and romance of the fabulous, candlelit Phantom's lair - with more emphasis on candlelight than lair, of course - would be a gorgeous ceremony and reception theme. Back to candlelight again! And the gigantic chandelier. I have always been in love with chandeliers, starting with the one my grandmother had hanging over her dining room table, and I have loved that aura of fire and crystal ever since. So, I've got candlelight and chandeliers in my head as a theme, and loving it. 


It would also let the bride wear a gorgeous formal gown, which is always cool. As long as there actually are not any references to Phantom of the Opera. Much as I love it, that would just be corny.


Here are a few fun idea pictures that I found on ProjectWedding.com:


Thursday, September 27, 2012

Art and Soul

Amazon.com
I came across My Beautiful Life while purchasing a Mums Wreath Kit at Paper Source. Due to a long, and I mean long, flight I'll be taking pretty soon, I was thrilled to see this way of killing time creatively (I mean the book, not the wreath. I'd love to make the wreath on the trip, but my fellow passengers wouldn't be happy). 

The book gives simple little prompts at the bottom of each page to get you drawing, like "My PJ's," "The contents of my refrigerator," and "My favorite movie star." Those are just a few of the prompts at the very beginning of this lovely hardcover, since I had only skimmed a few pages before I knew that I was dying to take a whirl at it. I want to approach this with pen and ink and let the creativity go wild, even with the seemingly mundane questions. The refrigerator theme, for instance, would be fun to tackle through contour drawing. In contour drawing, I  never pick up my pen from the page, resulting in a zany, doodle-like parade of images. I'm a bit scared of the "Favorite movie star" prompt, since I stink at drawing people. That means I could 1) draw the Black Stallion, since I rock at drawing horses, or 2) draw things that make me think of Maureen O'Hara, Angela Lansbury, Gregory Peck, or whoever my favorite star is that day.


The idea behind the book - that someone could learn tons about my life simply through drawings - got me thinking, since any art that I create gives insight into my tastes, feelings, and history.


Whether the art you create is an autumn shawl, a tooled-leather wallet, a watercolor miniature, a pair of beaded earrings, or a waterfowl decoy, every choice you make in its design comes from the thoughts and likes that make you unique. Even if you are copying a  pattern, the fact that you chose that pattern and none other speaks volumes.


So, when you go to create art, create what you love, not what others think you should, for art is most fulfilling when it compliments the feelings inside you, rather than trying to meet outside expectations. Few things are more fulfilling than creating, and creating things that express the spilling over of your soul.